SvelteKit - Create & Update

Senior Full-Stack Developer with over 20 years of experience building web applications for startups, government, and higher education.
Continuing from last time, we will explore the concepts behind Create and Update functionality and provide a step-by-step guide on how to implement it in your SvelteKit application. Let's get started!
Server & Client Code
In SvelteKit, the server-side code and client-side code are split between files. The server code is responsible for rendering the initial HTML for a page. The client code is responsible for handling user interactions and updating the page without requiring a full page refresh.
Server Code
The server code for the page is stored +page.server.ts, the .server name is important and signifies that this code will only ever run on the server. We're safe to make database calls and even store API secrets here.
Load
We call the Prisma function getTop3 to fetch the data from the database, this data is strongly typed when used in the svelte component page +page.svelte.
export const load = (async () => {
    return await getTop3();
}) satisfies PageServerLoad<{ todos: Todo[] }>;
Actions
The +page.server.js file exports actions, which allows us to POST data to the server using a <form> element in the page component. We have create and update actions that we receive the form data and call the Prisma code.
export const actions = {
    create: async ({ request }) => {
        const data = await request.formData();
        return createTop3((data.getAll('todo') as string[]) ?? []);
    },
    update: async ({ request }) => {
        const data = await request.formData();
        const id = Number(data.get('id'));
        const complete = data.get('todo') === 'on';
        return updateTodo(id, complete);
    }
} satisfies Actions;
Prisma Code
Nothing SvelteKit specific here, this is standard Prisma code used to fetch, create and update the database.
export async function getTop3(): Promise<{ todos: Todo[] }> {
    const top3 = await prisma.top3.findFirst({
        where: {
            createdAt: {
                equals: new Date()
            }
        },
        include: {
            todos: {
                orderBy: {
                    id: 'asc'
                }
            }
        }
    });
    return { todos: top3 ? top3.todos : [] };
}

export async function createTop3(data: string[]): Promise<Top3> {
    return await prisma.top3.create({
        data: {
            todos: {
                create: data.map((title) => ({ title, complete: false }))
            }
        }
    });
}

export async function updateTodo(id: number, complete: boolean): Promise<Todo> {
    return await prisma.todo.update({
        where: { id },
        data: {
            complete
        }
    });
}
Client Code
To call the create action from the page, we just need to add a standard HTML <form/>, no JavaScript is needed! We set its method to POST and the action to ?/create. This form data can then be processed in the +page.server.ts create action that we saw earlier.
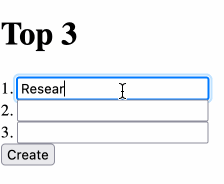
Create Top 3 Component
<form method="POST" action="?/create">
  <label> 1. </label>
  <input type="text" name="todo" autoFocus />
  <br />
  <label> 2. </label>
  <input type="text" name="todo" />
  <br />
  <label> 3. </label> <input type="text" name="todo" />
  <br />
  <button type="submit">Create</button>
</form>
Update Todo Component
To update the Todo data, again we just need to add a standard HTML <form/> and this time submit the form with the action ?/update. Notice the hidden input used to send the Todo id field to the server.
<div class="todo">
  <form method="POST" action="?/update" bind:this={form}>
    <input name="id" type="hidden" bind:value={todo.id} />
    <input id={`todo-${todo.id}`} name="todo" type="checkbox"
       bind:checked={todo.complete}
       on:change={() => form.requestSubmit()} />
  </form>

  <label for={`todo-${todo.id}`}>
    {todo.title}
  </label>
</div>
Demo
This gives us everything we need to create and update our daily top 3 todo items:
Next time
Next time we’ll take a look at adding some nice styling using Tailwind CSS.
You can grab the code from the GitHub Repository.